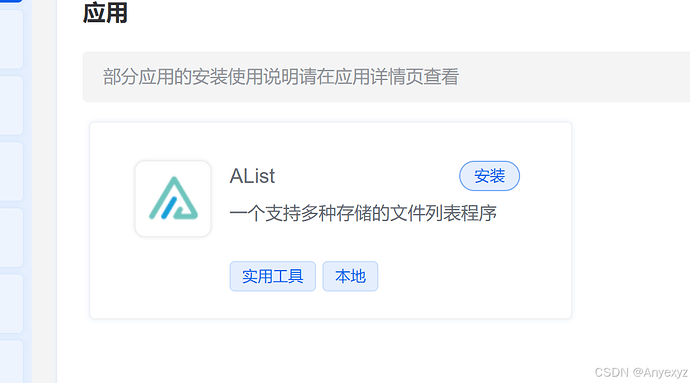
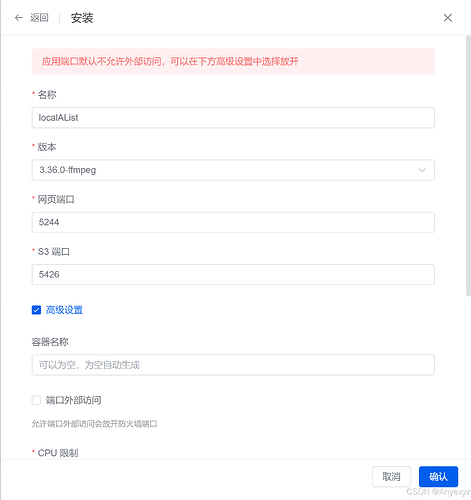
自助创建 1Panel 应用
前言
1Panel 作为一款开源的 Linux 服务器运维管理面板,其优质的 应用商店 想必也是很多人喜爱它的原因,除了官方的 应用列表 ,开源社区内也涌现出了许多优质的第三方应用商店资源,比如 okxlin/appstore 等等。当然,为了保证应用的长期稳定更新维护,官方商店的入门门槛基本都是 Star 10k+,所以有的时候我们可能需要一些小众应用,就需要自己动手。
官方教程
需要有 docker 和 docker-compose 相关知识
前提
- 活跃的开源项目
- 有官方维护的 docker 镜像
1. 创建应用文件 (以 Halo 为例)
v1.3 及以上版本可以在 1Panel 宿主机使用 1panel app init <应用的key> <应用的版本> 来快速初始化应用文件 (注意不是 1pctl 命令)
文件夹格式
├──halo // 以 halo 的 key 命名 ,下面解释什么是 key
	├── logo.png // 应用 logo , 最好是 180 * 180 px
	├── data.yml // 应用声明文件
	├── README.md // 应用的 README
	├── 2.2.0 // 应用版本 注意不要以 v 开头
	│   ├── data.yml // 应用的参数配置,下面有详细介绍
	│   ├── data // 挂载出来的目录
	|   ├── scripts // 脚本目录 存放 init.sh upgrade.sh uninstall.sh
	│   └── docker-compose.yml // docker-compose 文件
	└── 2.3.2
	    ├── data.yml
	    ├── data
	    └── docker-compose.yml
应用声明文件 data.yml
本文件主要用于声明应用的一些信息
additionalProperties:  #固定参数
    key: halo   #应用的 key ,仅限英文,用于在 Linux 创建文件夹
    name: Halo  #应用名称
    tags:
        - WebSite #应用标签,可以有多个,请参照下方的标签列表
    shortDescZh: 强大易用的开源建站工具 #应用中文描述,不要超过30个字
    shortDescEn: Powerful and easy-to-use open source website builder #应用英文描述
    type: website  #应用类型,区别于应用分类,只能有一个,请参照下方的类型列表
    crossVersionUpdate: true  #是否可以跨大版本升级
    limit: 0  #应用安装数量限制,0 代表无限制
    website: https://halo.run/  #官网地址
    github: https://github.com/halo-dev/halo #github 地址
    document: https://docs.halo.run/ #文档地址
应用标签 - tags 字段(持续更新。。。)
| key | name |
|---|---|
| WebSite | 建站 |
| Server | Web 服务器 |
| Runtime | 运行环境 |
| Database | 数据库 |
| Tool | 工具 |
| CI/CD | CI/CD |
| Local | 本地 |
应用类型 - type 字段
| type | 说明 |
|---|---|
| website | website 类型在 1Panel 中支持在网站中一键部署,wordpress halo 都是此 type |
| runtime | mysql openresty redis 等类型的应用 |
| tool | phpMyAdmin redis-commander jenkins 等类型的应用 |
应用参数配置文件 data.yml (注意区分于应用主目录下面的 data.yaml)
本文件主要用于生成安装时要填写的 form 表单,在应用版本文件夹下面
可以无表单,但是需要有这个 data.yml文件,并且包含 formFields 字段
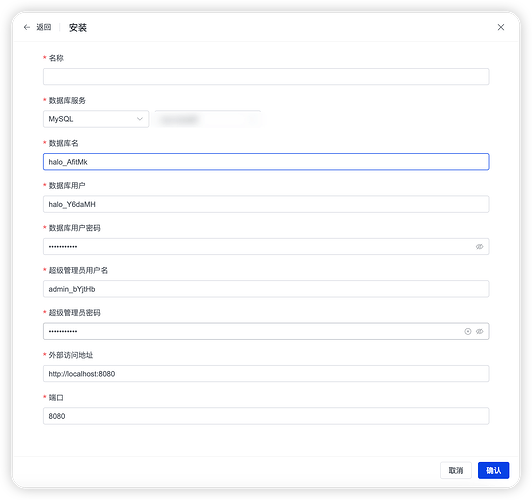
以安装 halo 时的 form 表单 为例
如果要生成上面的表单,需要这么填写 data.yml
additionalProperties:  #固定参数
    formFields:
        - default: ""
          envKey: PANEL_DB_HOST  #docker-compose 文件中的参数
          key: mysql  #依赖应用的 key , 例如 mysql
	  labelEn: Database Service  #英文的label
	  labelZh: 数据库服务  #中文的label
	  required: true  #是否必填
          type: service  #如果需要依赖其他应用,例如数据库,使用此 type
        - default: halo
          envKey: PANEL_DB_NAME
          labelEn: Database
          labelZh: 数据库名
          random: true  #是否在 default 文字后面,增加随机字符串
          required: true
          rule: paramCommon  #校验规则
          type: text  #需要手动填写的,使用此 type
        - default: halo
          envKey: PANEL_DB_USER
          labelEn: User
          labelZh: 数据库用户
          random: true
          required: true
          rule: paramCommon
          type: text
        - default: halo
          envKey: PANEL_DB_USER_PASSWORD
          labelEn: Password
          labelZh: 数据库用户密码
          random: true
          required: true
          rule: paramComplexity
          type: password  #密码字段使用此 type
        - default: admin
          envKey: HALO_ADMIN
          labelEn: Admin Username
          labelZh: 超级管理员用户名
          required: true
          rule: paramCommon
          type: text
        - default: halo
          envKey: HALO_ADMIN_PASSWORD
          labelEn: Admin Password
          labelZh: 超级管理员密码
          random: true
          required: true
          rule: paramComplexity
          type: password
        - default: http://localhost:8080
          edit: true
          envKey: HALO_EXTERNAL_URL
          labelEn: External URL
          labelZh: 外部访问地址
          required: true
          rule: paramExtUrl
          type: text
        - default: 8080
          edit: true
          envKey: PANEL_APP_PORT_HTTP
          labelEn: Port
          labelZh: 端口
          required: true
          rule: paramPort
          type: number #端口使用此 type
关于端口字段:
- PANEL_APP_PORT_HTTP 有 web 访问端口的优先使用此 envKey
- envKey 中包含 PANEL_APP_PORT 前缀会被认定为端口类型,并且用于安装前的端口占用校验。注意:端口需要是外部端口
关于 type 字段:
| type | 说明 |
|---|---|
| service |
type: service 如果该应用需要依赖其他组件,如 mysql redis 等,可以通过 key: mysql 定义依赖的名称,在创建应用时会要求先创建依赖的应用。 |
| password |
type: password 敏感信息,如密码相关的字段会默认不显示明文。 |
| text |
type: text 一般内容,比如数据库名称,默认明文显示。 |
| number |
type: number 一般用在端口相关的配置上,只允许输入数字。 |
| select |
type: select 选项,比如 true, false,日志等级等。 |
简单的例子
# type: service,定义一个 mysql 的 service 依赖。
- default: ""
    envKey: DB_HOST
    key: mysql
    labelEn: Database Service
    labelZh: 数据库服务
    required: true
    type: service

# type: password
- default: Np2qgqtiUayA857GpuVI0Wtg
    edit: true
    envKey: DB_PASSWORD
    labelEn: Database password
    labelZh: 数据库密码
    required: true
    type: password

# type: text
- default: 192.168.100.100
    disabled: true.
    envKey: REDIS_HOST
    labelEn: Redis host
    labelZh: Redis 主机
    type: text

# type: number
- default: 3306
    disabled: true
    envKey: DB_PORT
    labelEn: Database port
    labelZh: 数据库端口
    rule: paramPort
    type: number

# type: select
- default: "ERROR"
    envKey: LOG_LEVEL
    labelEn: Log level
    labelZh: 日志级别
    required: true
    type: select
    values:
        - label: DEBUG
          value: "DEBUG"
        - label: INFO
          value: "INFO"
        - label: WARNING
          value: "WARNING"
        - label: ERROR
          value: "ERROR"
        - label: CRITICAL
          value: "CRITICAL"
rule 字段目前支持的几种校验
| rule | 规则 |
|---|---|
| paramPort | 用于限制端口范围为 1-65535 |
| paramExtUrl | 格式为 http(s)://(域名/ip):(端口) |
| paramCommon | 英文、数字、.-和_,长度2-30 |
| paramComplexity | 支持英文、数字、.%@$!&~_-,长度6-30,特殊字符不能在首尾 |
应用 docker-compose.yml 文件
${PANEL_APP_PORT_HTTP} 类型的参数,都在 data.yml 中有声明
services:
  halo:
    image: halohub/halo:2.2.0
    container_name: ${CONTAINER_NAME}  // 固定写法,勿改
    restart: always
    networks:
      - 1panel-network  // 1Panel 创建的应用都在此网络下
    volumes:
      - ./data:/root/.halo2
    ports:
      - ${PANEL_APP_PORT_HTTP}:8090
    command:
      - --spring.r2dbc.url=r2dbc:pool:${HALO_PLATFORM}://${PANEL_DB_HOST}:${HALO_DB_PORT}/${PANEL_DB_NAME}
      - --spring.r2dbc.username=${PANEL_DB_USER}
      - --spring.r2dbc.password=${PANEL_DB_USER_PASSWORD}
      - --spring.sql.init.platform=${HALO_PLATFORM}
      - --halo.external-url=${HALO_EXTERNAL_URL}
      - --halo.security.initializer.superadminusername=${HALO_ADMIN}
      - --halo.security.initializer.superadminpassword=${HALO_ADMIN_PASSWORD}
    labels:
      createdBy: "Apps"

networks:
  1panel-network:
    external: true
2. 脚本
1Panel 在 安装之前、升级之前、卸载之后支持执行 .sh 脚本
分别对应 init.sh upgrade.sh uninstall.sh
存放目录(以halo为例) : halo/2.2.0/scripts
3. 本地使用
将应用目录上传到 1Panel 的 /opt/1panel/resource/apps/local 文件夹下
注意:/opt 为 1Panel 默认安装目录,请根据自己的实际情况修改
上传完成后,目录结构如下
├──halo
	├── logo.png
	├── data.yml
	├── README.md
	├── 2.2.0
		    ├── data.yml
		    ├── data
		    └── docker-compose.yml
在 1Panel 应用商店中,点击更新应用列表按钮同步本地应用
v1.2 版本及之前版本的本地应用,请参考这个文档修改
痛点及解决办法
原应用开发痛点
- 步骤描述不够详细,各个文件和目录的说明不清晰,对新手不友好。
- 需要开发者手动创建多层目录和文件,过程繁琐重复。
- 版本和参数配置需要多次切换编辑器,难以把握全貌。
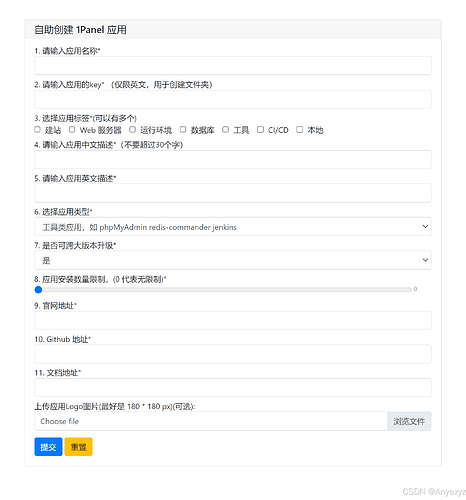
所以,我简单编写了一个自助构建 1Panel 应用的工具,开源在 此处,并通过 Hugging Face 构建了在线运行的 站点
优势
- 使用交互式对话框 detailed 描述了每个步骤和文件格式。
- 采用了程序化的方式自动化创建目录和文件,省去了开发者的重复工作。
- 整合在一个界面内完成版本和配置编写,方便开发者管理。
- 直接提供下载压缩包的功能,省去手动压缩步骤。
使用
一览
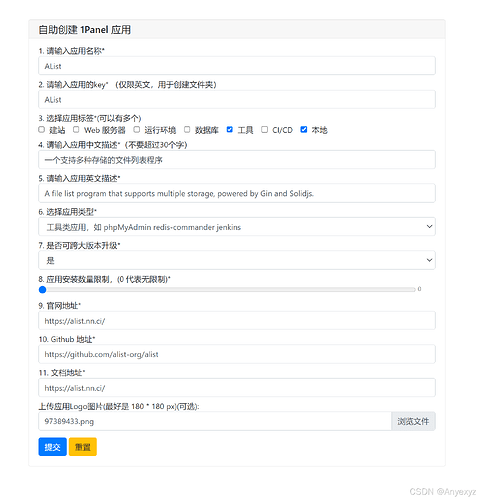
示例
-
填写基本信息,生成基本信息文件
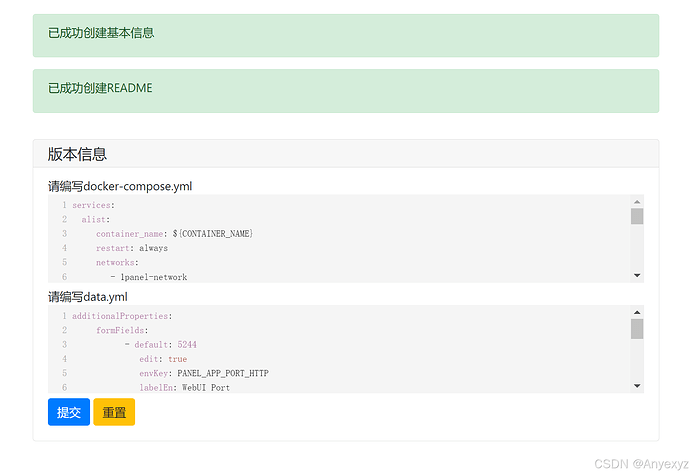
-
编写README文件,
一般可以从应用开源的地方去复制哟 -
填写版本号
-
编写
docker-compose.yml和data.yml文件
若应用官方提供了docker-compose文件,可以直接复制过来,参考上方官方文档中写的参数进行简单替换后写入 data.yml 即可。
5. 确认下载,即可下载部署完成的应用包。
6. 将其解压到服务器 /opt/1panel/resource/apps/local (注意:/opt 为 1Panel 默认安装目录,请根据自己的实际情况修改)后刷新应用商店即可找到
- 构建好的应用包在测试无误后也可以在 Github 上推送到官方商店或第三方商店参与开源项目哟~
代码一览
import zipfile
import yaml
from pywebio.input import *
from pywebio.output import *
from pywebio.platform import config
from pywebio.platform.tornado import start_server
from pathlib import Path
import shutil
import logging
import os
import io
import re

# 环境变量
APPS_DIR = Path("apps")
DEFAULT_LOGO = Path("default_logo.png")

# 初始化logging
logging.basicConfig(level=logging.INFO, format='%(asctime)s - %(levelname)s - %(message)s')

# 校验key是否为英文字符串
def is_valid_key(key):
    return bool(re.match(r'^[a-zA-Z]+$', key))

# 校验基本信息
def check_base_info(data):
    required_fields = [
        "name", "key", "tags", "shortDescZh", "shortDescEn",
        "type", "crossVersionUpdate", "website", "github", "document"
    ]
    for field in required_fields:
        if not data[field]:
            return (field, f"{field} 不能为空")
    if len(data["shortDescZh"]) > 30:
        return ("shortDescZh", "中文描述不能超过30个字")
    if not is_valid_key(data["key"]):
        return ("key", "key 必须是纯英文字符串")
    return None

# 保存文件
def save_file(path, content, mode='w', encoding=None):
    try:
        if 'b' in mode:  # 二进制模式
            with open(path, mode) as f:
                f.write(content)
        else:  # 文本模式
            with open(path, mode, encoding=encoding or 'utf-8') as f:
                f.write(content)
        logging.info(f"File saved successfully: {path}")
    except IOError as e:
        logging.error(f"Error saving file {path}: {e}")
        raise

# 复制文件
def copy_file(src, dst):
    try:
        shutil.copy(src, dst)
        logging.info(f"File copied successfully from {src} to {dst}")
    except IOError as e:
        logging.error(f"Error copying file from {src} to {dst}: {e}")
        raise

# 创建目录
def create_directory(path):
    try:
        path.mkdir(parents=True, exist_ok=True)
        logging.info(f"Directory created: {path}")
    except OSError as e:
        logging.error(f"Error creating directory {path}: {e}")
        raise

# 创建版本
def create_version(app_dir, existing_versions):
    while True:
        version = input("请输入应用的版本 (不要以v开头)")
        if version in existing_versions:
            put_error(f"版本 {version} 已存在,请输入一个新的版本号")
        else:
            break

    version_dir = app_dir / version
    create_directory(version_dir)

    version_info = input_group("版本信息", [
        textarea("请编写docker-compose.yml", name="docker_compose", code={"mode": "yaml", "theme": ""}),
        textarea("请编写data.yml", name="data", code={"mode": "yaml", "theme": ""}),
    ])


    save_file(version_dir / "data.yml", version_info["data"])
    save_file(version_dir / "docker-compose.yml", version_info["docker_compose"])
    put_success(f"已成功创建版本 {version}")

    return version

# 压缩文件夹
def zip_folder(folder_path, output_path):
    with zipfile.ZipFile(output_path, 'w', zipfile.ZIP_DEFLATED) as zipf:
        for root, _, files in os.walk(folder_path):
            for file in files:
                file_path = os.path.join(root, file)
                arcname = os.path.relpath(file_path, folder_path)
                zipf.write(file_path, arcname)

# 主函数
def main():
    base_info = input_group(
        "自助创建 1Panel 应用",
        [
            input("1. 请输入应用名称* ", name="name", type=TEXT),
            input("2. 请输入应用的key* (仅限英文,用于创建文件夹)", name="key", type=TEXT),
            checkbox("3. 选择应用标签*(可以有多个)", inline=True, options=[
                {"label": "建站", "value": "WebSite"},
                {"label": "Web 服务器", "value": "Server"},
                {"label": "运行环境", "value": "Runtime"},
                {"label": "数据库", "value": "Database"},
                {"label": "工具", "value": "Tool"},
                {"label": "CI/CD", "value": "CI/CD"},
                {"label": "本地", "value": "Local"},
            ], name="tags"),
            input("4. 请输入应用中文描述*(不要超过30个字)", name="shortDescZh", type=TEXT),
            input("5. 请输入应用英文描述*", name="shortDescEn", type=TEXT),
            select("6. 选择应用类型*", options=[
                {"label": "工具类应用,如 phpMyAdmin redis-commander jenkins", "value": "tool"},
                {"label": "支持一键部署的站点类应用类型,如 wordpress halo", "value": "website"},
                {"label": "服务类型的运行时应用,如	mysql openresty redis", "value": "runtime"},
            ], name="type"),
            select("7. 是否可跨大版本升级*", options=[
                {"label": "是", "value": True},
                {"label": "否", "value": False},
            ], name="crossVersionUpdate"),
            slider("8. 应用安装数量限制,(0 代表无限制)*", name="limit", min=0, max=100, step=1, value=0),
            input("9. 官网地址*", name="website", type=URL),
            input("10. Github 地址*", name="github", type=URL),
            input("11. 文档地址*", name="document", type=URL),
            file_upload("上传应用Logo图片(最好是 180 * 180 px)(可选): ", name="logo", accept=[".png", ".jpg", ".jpeg"], max_size="5M"),
        ],
        validate=check_base_info,
    )

    app_dir = APPS_DIR / base_info["key"]
    create_directory(app_dir)

    app_info = {
        "additionalProperties": {
            "key": base_info["key"],
            "name": base_info["name"],
            "tags": base_info["tags"],
            "shortDescZh": base_info["shortDescZh"],
            "shortDescEn": base_info["shortDescEn"],
            "type": base_info["type"],
            "crossVersionUpdate": base_info["crossVersionUpdate"],
            "limit": base_info["limit"],
            "website": base_info["website"],
            "github": base_info["github"],
            "document": base_info["document"],
        }
    }

    save_file(app_dir / "data.yml", yaml.dump(app_info, allow_unicode=True))

    if base_info["logo"]:
        _, file_extension = os.path.splitext(base_info["logo"]["filename"])
        logo_filename = f"logo{file_extension.lower()}"
        save_file(app_dir / logo_filename, base_info["logo"]["content"], mode='wb')
    else:
        copy_file(DEFAULT_LOGO, app_dir / "logo.png")

    put_success("已成功创建基本信息")

    readme = textarea("请编写README", code={"mode": "markdown", "theme": ""})
    save_file(app_dir / "README.md", readme)
    put_success("已成功创建README")

    versions = []
    while True:
        version = create_version(app_dir, versions)
        versions.append(version)
        if not actions("是否继续创建新版本?", [
            {"label": "是", "value": "yes"},
            {"label": "否", "value": "no"},
        ]) == "yes":
            break

    # 压缩应用文件夹
    zip_buffer = io.BytesIO()
    zip_folder(app_dir, zip_buffer)
    zip_buffer.seek(0)

    # 美化下载按钮
    put_button(
        f"下载 {base_info['name']} 应用文件",
        onclick=lambda: put_file(f"{base_info['key']}.zip", zip_buffer.getvalue()),
        color="success",
        outline=True
    )

if __name__ == "__main__":
    config(title="自助创建 1Panel 应用")
    start_server(main, debug=False, port=8080, cdn=False)
