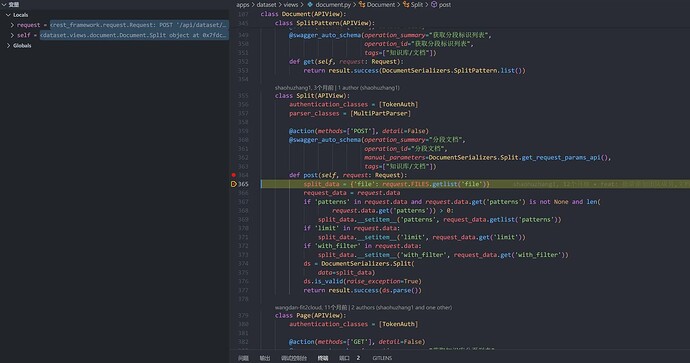
MaxKB 系统后端服务启动时需要同时启动 2 个服务,分别是:web、celery,对应的 django 服务分别是:runserver、celery,其中 runserver 是 django 内置命令,用于启动后端 web 服务,celery 是自定义命令,其中 celery 是用于启动分布式任务队列服务,celery 队列是系统依赖的关键服务。
另外 MaxKB 开发模式下还有一个 local_model 自定义命令,用于调试本地启动的 MaxKB 服务,与上面 web 模式的区别就是启动时指定的 IP 和端口由 '0.0.0.0:8080' 改为了 ‘127.0.0.1:11636’ ,具体选择 web 模式调试还是 local_model 模式调试,可根据服务实际部署情况决定。通常情况下在本地私有云服务器部署的服务选用 web 模式启动即可。
配置调试参数(以 vscode 为例,pycharm 类似):
{
    "version": "0.2.0",
    "configurations": [
        {
            "name": "dev-web",
            "type": "debugpy",
            "request": "launch",
            "program": "main.py",
            "console": "integratedTerminal",
            // 调试 web 服务程序
            "args": ["dev", "web"],
            "justMyCode": false,
        },
        {
            "name": "dev-celery",
            "type": "debugpy",
            "request": "launch",
            "program": "main.py",
            "console": "integratedTerminal",
            // 调试 celery 程序
            "args": ["dev", "celery"],
            "justMyCode": false,
        }
    ]
}
1 调试 web 程序
-
手动启动 celery 服务
python3 main.py dev celery -
开启 IDE 调试模式,选择
dev-web配置项,设置断点,开始调试;
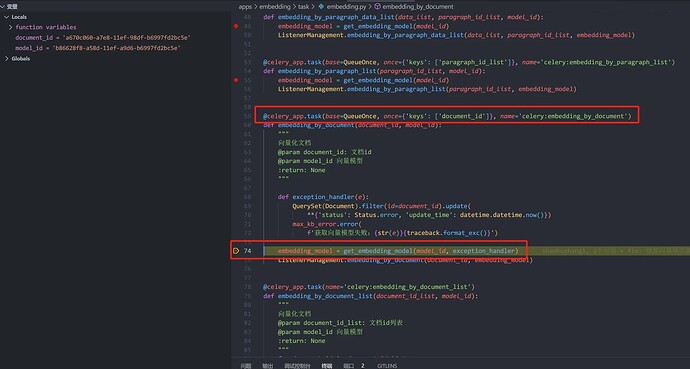
2 调试 celery 程序
-
开启 IDE 调试模式,选择
dev-celery配置项,设置断点,开始调试; -
启动 web 服务;
python3 main dev web -
配置 celery 为同步模式,便于本地调试
app = Celery('MaxKB') app.conf.update( task_always_eager = True, # 允许抛出异常 task_eager_propagates=True, ) -
触发 celery 程序调用,观察调试结果;
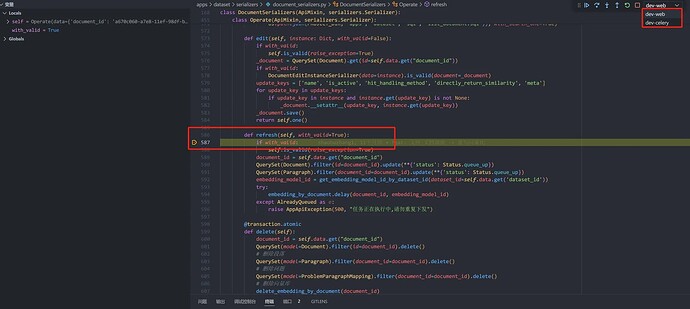
3 同时调试 web 和 celery
vscode 支持同时启动两个调试程序,根据上述上述调试配置参数,分别启动两个调试程序:
-
调试参数配置:
{ "version": "0.2.0", "configurations": [ { "name": "dev-web", "type": "debugpy", "request": "launch", "program": "main.py", "console": "integratedTerminal", "args": ["dev", "web"], "justMyCode": false, }, { "name": "dev-celery", "type": "debugpy", "request": "launch", "program": "main.py", "console": "integratedTerminal", "args": ["dev", "celery"], "justMyCode": false, } ] } -
启动 dev-celery 和 dev-web 调试程序:
4 另一种 Celery 程序调试方式(未验证)
还有一个不将 celery 配置为同步执行的模式,通过将调试工具 attach 到 celery 的 worker 进程中的方式来调试 celery 程序,这里没验证,现记录一下:
-
安装
debugpy:pip install debugpy -
修改 Worker 启动代码:在 Celery 应用启动时添加
debugpy的监听代码:import debugpy debugpy.listen(("0.0.0.0", 5678)) # 监听地址和端口 print("Waiting for debugger attach...") debugpy.wait_for_client() # 等待调试器连接 -
启动 Celery Worker:
使用以下命令运行 Worker:celery -A tasks worker --loglevel=info -
配置 VS Code 调试器:
在.vscode/launch.json中添加以下配置:{ "name": "Attach to Celery Worker", "type": "python", "request": "attach", "connect": { "host": "localhost", "port": 5678 }, "justMyCode": false} -
启动调试器:
- 在任务代码中设置断点。
- 运行 VS Code 调试配置
Attach to Celery Worker。
-
执行任务:
正常执行任务即可,查看是否进入调试模式;


